Regras de reposição
As regras de reposição são usadas para manter os níveis de estoque previstos acima de um determinado limite, sem exceder um limite superior especificado. Isso é feito indicando a quantidade mínima que o estoque deve conter e a quantidade máxima que o estoque não deve exceder.
Reordering rules can be configured for each product based on the route used to replenish it. If a product uses the Buy route, then a request for quotation (RFQ) is created when the reordering rule is triggered. If a product uses the Manufacture route, then a manufacturing order (MO) is created instead. This is the case regardless of the selected replenishment route.
Ver também
To set up reordering rules for the first time, refer to:
To understand and optimize replenishment using advanced features, see:
Reordering rules setup
To configure automatic and manual reordering rules, complete the following:
Product type configuration
A product must be configured correctly to use reordering rules. Begin by navigating to , then select an existing product, or create a new one by clicking New.
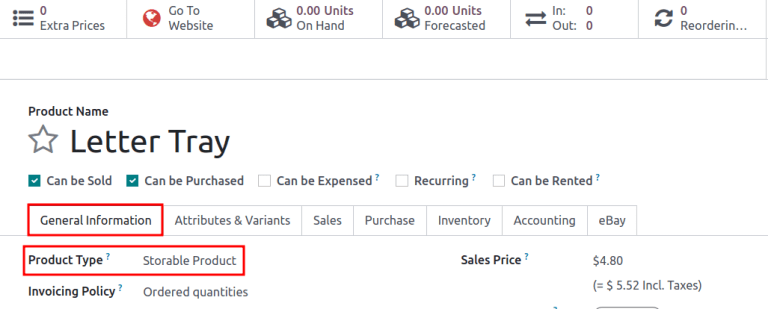
On the product form, under the General Information tab, set the Product Type to Storable Product. This is necessary because Odoo only tracks stock quantities for storable products, and quantities are needed to trigger reordering rules.
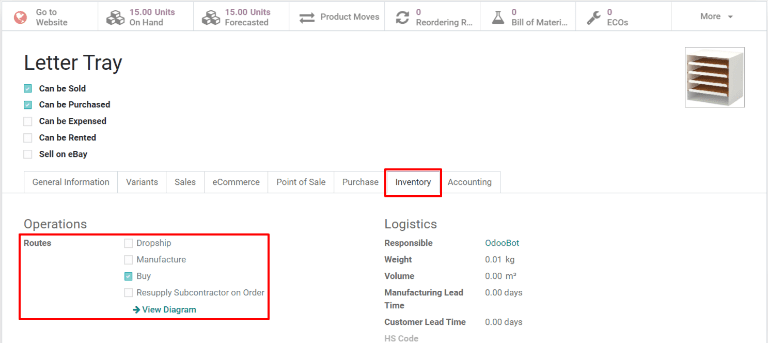
Next, click the Inventory tab and select one or more routes from the Routes section. Doing so tells Odoo which route to use to replenish the product.
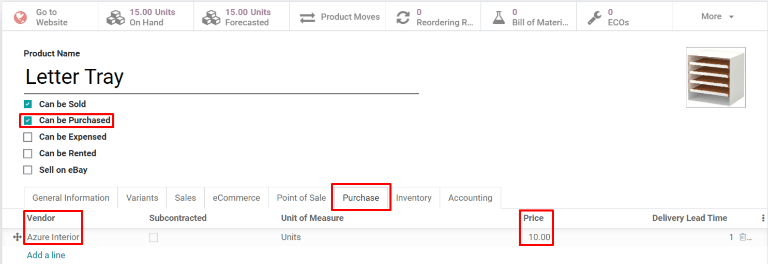
Se o produto for reposto pela rota Comprar, confirme se a caixa de seleção Pode ser comprado está ativada sob o nome do produto. Isso faz com que seja exibida a aba Compra. Clique na aba Compra e especifique pelo menos um fornecedor e o preço pelo qual ele vende o produto, para que o Odoo saiba de qual empresa o produto deve ser comprado.
If the product is replenished using the Manufacture route, it needs to have at least one bill of materials (BoM) associated with it. This is necessary because Odoo only creates manufacturing orders for products with a BoM.
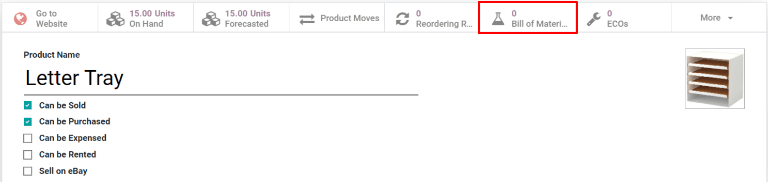
If a BoM does not already exist for the product, select the Bill of Materials smart button at the top of the product form, then click New to configure a new BoM.
Criar novas regras de reposição
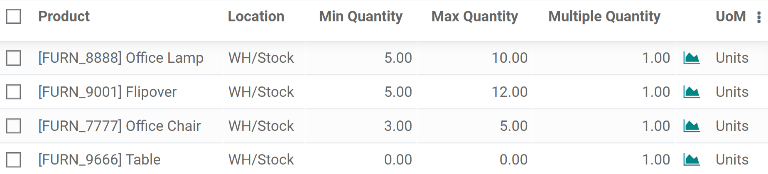
To create a new reordering rule, navigate to , then click New, and fill out the following fields in the new line:
Product: The product that requires replenishment.
Location: The specific location where the product is stored.
Min Quantity: The minimum amount of product that should be available. When inventory levels goes below this number, the replenishment is triggered.
Max Quantity: The amount of product that should be available after replenishing the product.
Multiple Quantity: If the product should be ordered in specific quantities, enter the number that should be ordered. For example, if the Multiple Quantity is set to
5, and only 3 are needed, 5 products are replenished.
Dica
Reordering rules can also be created from the Reordering Rules smart button on the product form.
Nota
To learn how the On Hand, Forecast, and To Order fields are calculated using on-hand quantities and future demand, see the Just-in-time logic section.
Para uso avançado das regras de reposição, saiba mais sobre os seguintes campos de regras de reposição:
Nota
The fields above are not available by default, and must be enabled by selecting the (adjust) icon in the far-right corner and selecting the desired column from the drop-down menu.
Disparo
A reordering rule’s trigger can be set to automatic or manual. While both function the same way, the difference between the two types of reordering rules is how the rule is launched:
Auto: A purchase or manufacturing order is automatically created when the forecasted stock falls below the reordering rule’s minimum quantity. By default, the Auto trigger is selected.
Manual: The Replenishment report lists products needing replenishment, showing current/forecasted stock, lead times, and arrival dates. Users can review forecasts before clicking Order Once.
To enable the Trigger field, go to or . Then, click the (adjust) icon, located to the far-right of the column titles, and tick the Trigger checkbox.
Na coluna Disparo, selecione Auto ou Manual. Consulte as seções abaixo para saber mais sobre os diferentes tipos de regras de reposição.
Automático
Automatic reordering rules, enabled by setting the reordering rule’s Trigger field to Auto, generate purchase or manufacturing orders when either:
The scheduler runs, and the Forecasted quantity is below the minimum, or
A sales order is confirmed, and lowers the Forecasted quantity of the product below the minimum.
If the Buy route is selected, then an RFQ is generated. To view and manage RFQs, navigate to .
If the Manufacture route is selected, then an MO is generated. To view and manage MOs, navigate to .
Quando nenhuma rota é selecionada, o Odoo seleciona a Rota especificada na aba Inventário do formulário do produto.
Dica
O agendador está definido para ser executado uma vez por dia, por padrão.
Para acionar manualmente uma regra de reposição antes da execução do agendador, garanta modo de desenvolvimento está ativado, e selecione . Em seguida, clique no botão verde Executar agendados na janela pop-up exibida.
Esteja ciente de que isso também aciona as outras ações agendadas.
Exemplo
O produto, Lâmpada de escritório, tem uma regra de reposição automático definida para ser acionada quando a quantidade prevista cair abaixo da Quantidade mínima de 5,00. Como a Previsão atual é 55,00, a regra de reposição não é acionada.

Manual
Manual reordering rules, configured by setting the reordering rule’s Trigger field to Manual, list a product on the replenishment dashboard when the forecasted quantity falls below a specified minimum. Products on this dashboard are called needs, because they are needed to fulfill upcoming sales orders, for which the forecasted quantity is not enough.
The replenishment dashboard, accessible by navigating to , considers sales order deadlines, forecasted stock levels, and vendor lead times. It displays needs only when it is time to reorder items, thanks to the To Reorder filter.

Rota preferencial
Odoo allows for multiple routes to be selected as replenishment methods under the Inventory tab on each product form. For instance, it is possible to select both Buy and Manufacture, indicating to Odoo that the product can be bought or manufactured.
Odoo also enables users to set a preferred route for a product’s reordering rule. This is the route that the rule defaults to if multiple are selected. To select a preferred route, begin by navigating to or .
Clique dentro da coluna na linha de uma regra de reposição, e um menu suspenso mostrará todas as rotas disponíveis para essa regra. Selecione uma delas para defini-la como a rota preferencial.

Importante
Se várias rotas forem ativadas para um produto, mas nenhuma rota preferencial estiver definida para sua regra de reposição, o produto será reposto usando a rota selecionada que estiver listada primeiro na aba Inventário do formulário do produto.
Advanced uses
Pairing Preferred Route with one of the following fields on the replenishment report unlocks advanced configurations of reordering rules. Consider the following:
Vendor: When the selected Preferred Route is Buy, setting the Vendor field to one of the multiple vendors on the vendor pricelist indicates to Odoo that the vendor is automatically populated on RFQs when a reordering rule triggers the creation of a purchase order.
Bill of Materials: When the Preferred Route is set to Manufacture, and there are multiple BoMs in use, specifying the desired BoM in the replenishment report, draft manufacturing orders are created with this BoM in use.
Procurement Group: This is a way to group related POs or MOs that are tied to fulfilling a specific demand, like an SO or a project. It helps organize and track which orders are linked to a particular demand.
Nota
Procurement groups link replenishment methods to demand, enabling smart buttons to appear when using the MTO route.
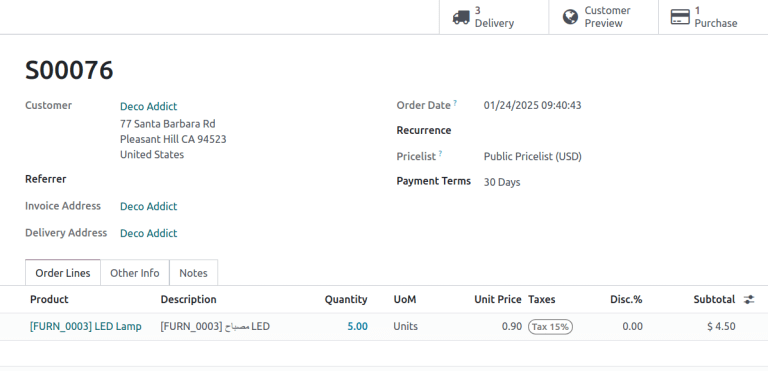
Sales order (demand) with a linked purchase order (replenishment method).
In the context of reordering rules:
Reordering rules do not automatically assign a procurement group, which is why there are no smart buttons that link SOs to POs, unlike the MTO route.
To enable smart buttons for products replenished by reordering rules (not MTO), with specific quantities linked to specific demands (e.g. SOs), assign a procurement group.
Without a procurement group, demands for the same product can be combined into a single RFQ, even if the reordering rule is executed multiple times for those demands. This allows for more efficient procurement by consolidating demands into fewer orders.
Selecting a procurement group in the Procurement Group field on the replenishment report ensures that all linked orders are grouped under the same demand, based on the defined route.
How can you set the *Procurement Group*, *Vendor*, and *Preferred Route* fields on the replenishment report to generate a single |RFQ| for five different products in sales order SO35, given they share the same vendor, Azure Interior, and ensure other demands for these products are handled separately?
View the answer
Set the Procurement Group to
SO35, in the reordering rule for all five products. This groups the demands forSO35in the same RFQ or MO.Set the Vendor to
Azure Interiorto ensure the RFQ is created for the same supplier.Set the Preferred Route to Buy to generate an RFQ.
Click the Order Once button to generate a single RFQ for the five products tied to
SO35.
After placing the order, removeSO35from the Procurement Group field of the five products’ reordering rules. This ensures future demands for these products are managed separately and assigned to different RFQs (the usual behavior).
Just-in-time logic
Just-in-time logic in Odoo minimizes storage costs by placing orders precisely to meet deadlines. This is achieved using the forecasted date, which determines when replenishment is necessary to avoid overstocking.
The forecasted date is the earliest possible date to receive a product if the replenishment process starts immediately. It is calculated by summing the lead times linked to the replenishment process, such as vendor lead times and purchasing delays for purchases, or manufacturing lead times for production. Both automatic and manual reordering rules work this way.
Exemplo
For a product with a 5-day total lead time and a sales order delivery date in 10 days, Odoo waits 5 days to place the order, ensuring it arrives just in time for delivery.
Important considerations:
If this feels risky, consider adding buffer time or adjusting lead times for more flexibility.
While lead times and just-in-time logic provide additional control, reordering rules work perfectly fine without them. Keeping delivery dates on sales orders as their creation date ensures purchases are immediately triggered when needed
Forecasted date and To Order quantity
To view the forecasted date, go to the replenishment report and click the (info) icon for the desired reordering rule. The Replenishment Information pop-up window displays the Forecasted Date and various lead times.
The forecasted date is the total time needed to procure a product in Odoo. It is calculated by summing the lead times linked to the product’s replenishment process. The total of these lead times, added to the current date, determines when Odoo checks for demanded stock.
Importante
The forecasted date is the earliest possible date the customer can receive the product if the replenishment process began right now. It is calculated by adding all lead times related to the product to the current date.
Exemplo
A manual reordering rule is set up with no minimum or maximum quantities.
Vendor lead time is 4 days, the purchase security lead time is 1 day, and the days to purchase is 2 days.
Today’s date is November 26.
These add up to 7 days, making the forecasted date, December 3rd.
A confirmed SO for 5 units has a delivery date of December 3rd (7 days from today). This demand will appear on the replenishment report today, in the To Order field.
However, if the delivery date were later than December 3rd, it would not yet appear on the report. Odoo only displays quantities to replenish when they fall within the forecasted date window, ensuring orders are placed precisely when needed.
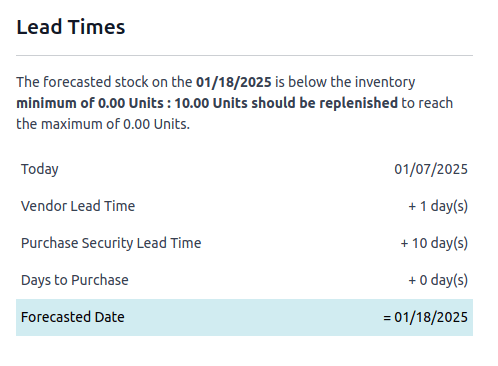
The just-in-time logic ensures replenishment happens only when it’s necessary for the forecasted date’s demand, helping avoid overstocking.
Por exemplo:
If the forecasted quantity drops below the minimum on the forecasted date, replenishment must begin immediately to avoid shortages.
If the quantity drops below the minimum after the forecasted date, replenishment can wait.
The To Order quantity is the total demand on the forecasted date.
By timing purchase orders based on the combined lead times, Odoo optimizes stock levels, keeping inventory minimal while ensuring future requirements are ordered at the last possible moment—strategic procrastination without the stress!
Common confusion about forecasted quantities
SOs due after the Forecasted Date are not accounted for in the Forecast quantities of the reordering rule.
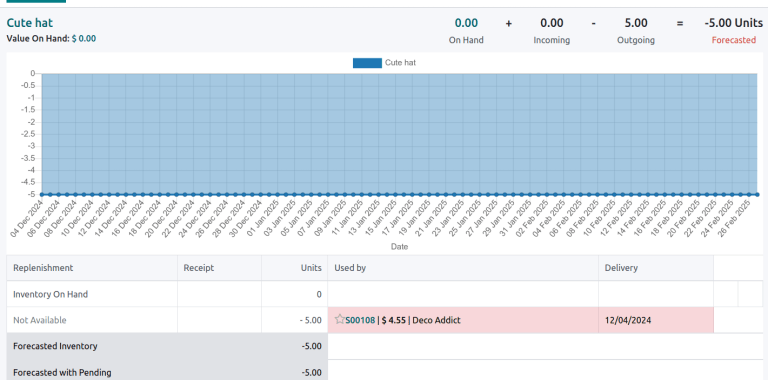
They are, however, accounted for on the forecasted report that is opened by clicking the (graph) icon on the replenishment report, as this one represents the long-term forecasted quantity.

Dias de visibilidade
Visibility days enable the ability to determine if additional quantities should be added to the planned replenishment. Odoo checks if forecasted stock on the forecasted date will drop below the minimum in the reordering rule. Only if it is time to reorder, visibility days check additional future demand by the specified number of days.
This feature helps consolidate orders by grouping immediate and near-future needs, reducing transport costs and enabling supplier discounts for larger orders.
To set visibility days to incorporate orders for a specified number of days in the future, navigate to , or by clicking the Reordering Rules smart button from the product form.
Next, enable the Visibility Days field by clicking the (adjust) icon to the far right and choosing the feature from the drop-down menu. Then, enter the desired visibility days.
Importante
The forecasted date is never pushed forward or extended; Odoo only checks the extra visibility days if the stock falls below the minimum threshold on the forecasted date.
Example where visibility days is triggered
A product shipped from Asia has a combined vendor lead time of 30 days and a shipping cost of $100 (including landed costs and tariffs).
November 4: Current date. The forecasted date is December 4 (30 days later).
SO 1: Requires the product by Dec 4. Odoo places the order today, costing $100.
SO 2: Requires the product by Dec 19. Normally, Odoo would order on Nov 19, costing an additional $100.
SO 3: Requires the product by Dec 25. Normally, Odoo would order on Nov 25, costing another $100.
Ordering separately for these sales orders totals $300 in shipping costs.
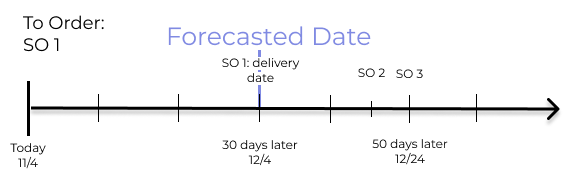
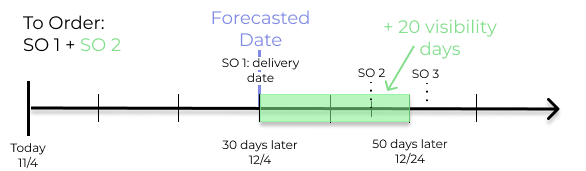
Setting Visibility Days to 20.0 allows Odoo to “look ahead” 20 days from December 4
(SO 1’s forecasted date) to December 24.
It groups SO 2’s order with SO 1, reducing shipping costs by consolidating orders.
SO 3, which is due on Dec 25, is one day late and is not grouped with the other two orders.
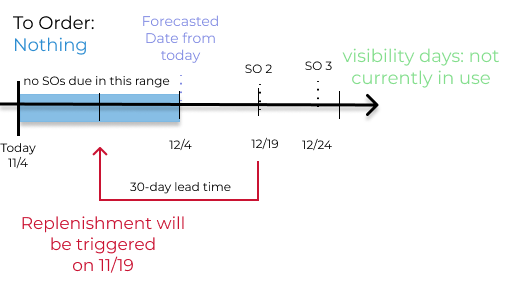
Counterexample where visibility days is not triggered
Considering the example above, if SO 1 does not exist, then:
November 4: Current date. The forecasted date is December 4 (30 days later).
November 5: The forecasted date shifts to December 5.
SO 2: Requires the product by December 19. Odoo will only trigger the order on November 19, meaning the user will not see a replenishment notification until then.
This shows that visibility days complement just-in-time logic by optimizing it to balance replenishment costs more effectively.