
Fluxo padrão do Odoo. Consulte também o procedimento KMEE para os módulos brasileiros.
Faturamento eletrônico (EDI)
EDI, ou intercâmbio eletrônico de dados, é a comunicação entre empresas de documentos comerciais, como pedidos de compra e faturas, em um formato padrão. O envio de documentos de acordo com um padrão EDI garante que a máquina que recebe a mensagem possa interpretar as informações corretamente. Existem vários formatos de arquivos EDI disponíveis, dependendo do país de sua empresa.
O recurso EDI permite automatizar a administração entre empresas, além de ser exigido por alguns governos para controle fiscal ou para facilitar a administração.
O faturamento eletrônico de seus documentos, como faturas de clientes, notas de crédito ou contas de fornecedores, é uma das aplicações do EDI.
O Odoo suporta, entre outros, os seguintes formatos.
Nome do formato |
Aplicações |
|---|---|
Factur-X (PDF/A-3) |
For French and German companies |
Peppol BIS Billing 3.0 (UBL BIS Billing 3.0) |
For companies whose countries are part of the EAS list |
E-FFF |
For Belgian companies |
XRechnung (UBL) |
For German companies |
Fattura PA (IT) |
For Italian companies |
CFDI (4.0) |
For Mexican companies |
Peru UBL 2.1 |
For Peruvian companies |
SII IVA Llevanza de libros registro (ES) |
For Spanish companies |
UBL 2.1 (Columbia) |
For Colombian companies |
Autoridade fiscal egípcia |
For Egyptian companies |
E-Invoice (IN) |
For Indian companies |
NLCIUS (Netherlands) |
For Dutch companies |
EHF 3.0 |
For Norwegian companies |
SG BIS Billing 3.0 |
For Singaporean companies |
A-NZ BIS Billing 3.0 |
For Australian/New Zealand companies |
Peppol |
For Peppol |
Ver também
Fiscal localizations
Configuração
Go to and enable the formats you need for this journal.
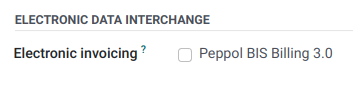
Once an electronic invoicing format is enabled, XML documents are generated when clicking on Confirm in documents such as invoices, credit notes, etc. These documents are either visible in the attachment section, or embedded in the PDF.
Nota
For E-FFF, the xml file only appears after having generated the PDF (Print or Send & Print button), since the PDF needs to be embedded inside the xml.
Every PDF generated from Odoo contains a Factur-X XML file (for interoperability purpose). For German and French companies, the option Factur-X (PDF/A-3) in addition enables validation checks on the invoice and generates a PDF/A-3 compliant file, required by plaftorms like Chorus Pro.
The formats available depend on the country registered in your company’s General Information.
Odoo supports the Peppol BIS Billing 3.0 format that can be used via existing access points.
Peppol
The Peppol network ensures the exchange of documents and information between companies and governmental authorities. It is primarily used for electronic invoicing, and its access points (connectors to the Peppol network) allow companies to send electronic documents such as customer invoices and credit notes and receive documents like vendor bills and refunds.
In this case, Odoo acts as both an access point and an SMP and enables electronic invoicing transactions without the need to send invoices or bills by email or post.
Nota
Make sure to install the Peppol module (
account_peppol).Peppol registration is free and available in Odoo Community.
Supported formats for sending documents include BIS Billing 3.0, XRechnung CIUS, and NLCIUS.
- The following countries are eligible for Peppol registration in Odoo:Andorra, Albania, Austria, Bosnia and Herzegovina, Belgium, Bulgaria, Switzerland, Cyprus, Czech Republic, Germany, Denmark, Estonia, Spain, Finland, France, United Kingdom, Greece, Croatia, Hungary, Ireland, Iceland, Italy, Liechtenstein, Lithuania, Luxembourg, Latvia, Monaco, Montenegro, North Macedonia, Malta, Netherlands, Norway, Poland, Portugal, Romania, Serbia, Sweden, Slovenia, Slovakia, San Marino, Turkey, Holy See (Vatican City State)
Registration
To register on Peppol, go to , scroll to the PEPPOL Electronic Document Invoicing section, and fill in the following information:
Peppol EAS: Peppol Electronic Address Scheme, which usually depends on the company’s country. This field is often prefilled with your country’s most commonly used EAS code. For example, the preferred EAS code for most companies in Belgium is
0208.Peppol Endpoint: usually a Company Registry number or a VAT number
Mobile Number, including the country code (e.g.,
+32in Belgium)Primary contact email
Ver também
Peppol endpoint - OpenPeppol eDEC Code Lists (open the “Participant Identifier Schemes” as HTML page)
Click Validate registration.
The registration should be automatically activated, and the Application status should be updated within a day.
Select another purchase journal in the Incoming Invoices Journal field if necessary.
All invoices can then be sent directly using Peppol.
Nota
To update the Primary contact email, modify it and click Update contact details.
If you are using an access point from a previous provider, make sure to deregister from it first, then register with your new access point, unless it’s Hermes (BOSA). If using Hermes (BOSA), no action is needed; the migration is handled automatically.
Dica
To manually trigger the scheduled action used to check the Peppol registration status, enable developer mode, open the Settings app, go to , and search for Peppol: update participant status. Open the scheduled action, then click Run Manually.
To try Peppol without sending real data, use the demo mode by setting the account_edi_proxy_client.demo system parameter to
demo. This has to be done before clicking Validate registration.For advanced testing on Peppol’s dedicated test network, use the test mode by setting the account_edi_proxy_client.demo system parameter to
test. This option is intended for experienced users only. This has to be done before clicking Validate registration.
Contact verification
Before sending an invoice to a contact using Peppol, make sure the contact is registered as a Peppol participant. To do so, follow these steps:
Go to and access the customer’s form.
In the Accounting tab, check the following information in the Electronic Invoicing section:
Format: BIS Billing 3.0, XRechnung CIUS, or NLCIUS.
Peppol e-address (EAS): Select the relevant EAS code in the dropdown list.
Peppol Endpoint: Enter the customer’s endpoint identifier.
Click Verify. Its Peppol endpoint validity is marked as Valid if the contact is found on the Peppol network.
Importante
While Odoo prefills both the EAS code and the endpoint number based on the information available for a contact, verifying these details with the contact is recommended.
Send invoices
To generate Peppol documents for invoices of a journal enable the EDI format called ‘Peppol’ on the journal. This should have happened automatically for countries in which Peppol is used by installing the module. Then confirming an invoice will generate Peppol a document in the format selected on the partner during the contact verification.
Posted invoices to be sent via Peppol are marked as Ready to send in the invoice’s PEPPOL status field.
Nota
All invoices that are ready to be sent via Peppol can be viewed in the following ways:
In the Invoices list view, use the (adjust settings) button to add the PEPPOL status column or apply the Peppol Ready filter in the search bar.
In the Accounting dashboard, click Peppol ready invoices on the relevant sales journal.
To send the invoice to the customer via Peppol, click Send & Print on the confirmed invoice form. In the Send window, enable Send via PEPPOL options, then click Send & Print (or Send or Send (Peppol) or Print depending on which of the Print and Email options are selected).
Dica
Multiple invoices can also be sent in batches via Peppol by using the Invoices list view.
Once the invoices are sent via Peppol, their PEPPOL status is changed to Processing.
The status is updated to Done once the invoices have been successfully delivered to the contact’s access point.
Dica
To manually trigger the scheduled action used to check the invoices’ status, go to the Accounting dashboard and click Fetch Peppol invoice status on the corresponding sales journal.
Receive vendor bills
New documents received via Peppol are checked multiple times a day. Received documents are automatically imported into the purchase journal set in the PEPPOL Electronic Document Invoicing section, and corresponding vendor bills are created as drafts and appear in the vendor bills list view.
Dica
To manually trigger the scheduled action to retrieve incoming Peppol documents, go to the Accounting dashboard and click Fetch from Peppol on the main Peppol purchase journal.
Peppol deregistration from Odoo
Only one Peppol receiver registration can be active for each Peppol endpoint identifier at a time. To stop using Odoo as the Peppol access point, e.g., to switch to another provider or reconfigure the registration for a new database, you must first deregister from Peppol. To do so, go to , scroll down to the PEPPOL Electronic Invoicing section, and click Deregister from Peppol.
Once removed, the Peppol registration is deleted from the database, and documents can no longer be sent or received via Peppol in Odoo.